Wednesday, August 19, 2015

Baby Bear Hooded Cowl

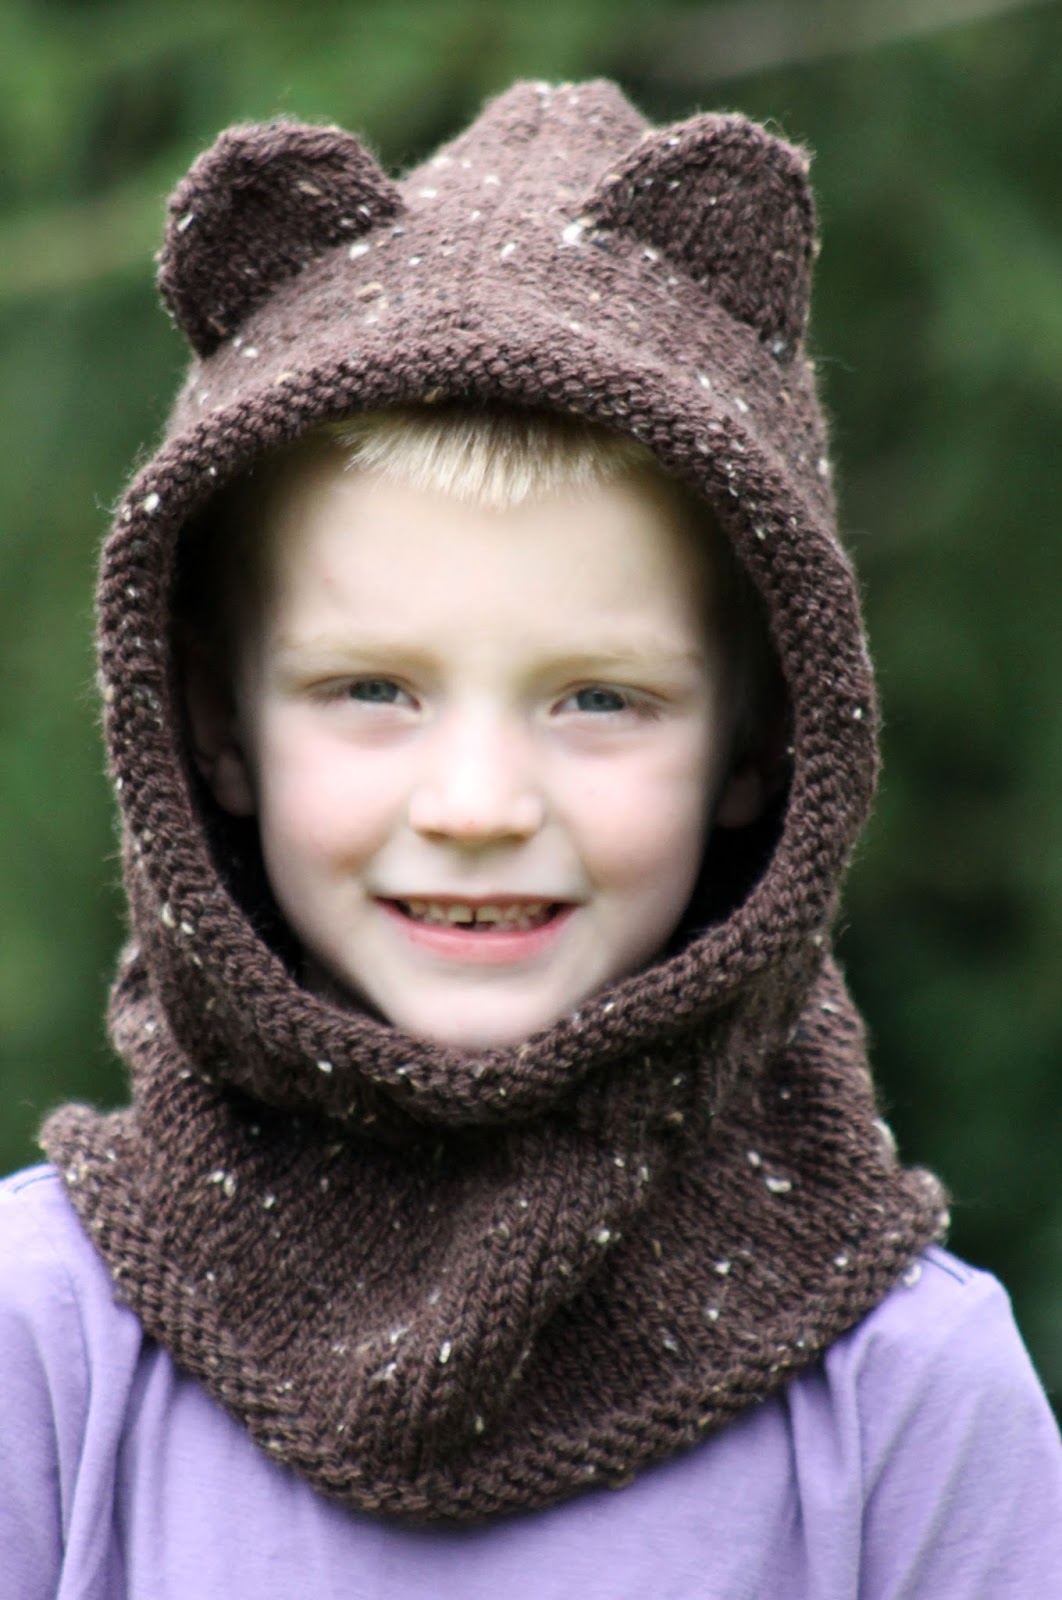
Baby Bear Hooded Cowl
Size 7 - 12 (so it will fit more snugly on a larger child)

I think we've probably all seen some version of this hat, what with the ears, the hood, and the cute kid poking out and all. So here, by request, let me present my version: the Baby Bear Hooded Cowl, which knits up quickly on size US 10 needles and with chunky weight yarn. Of course, it's not just kids who deserve to look this cute, so I've also sized the thing from toddler to adult. Make one for your husband! He'll love it, I promise (note: my promise does not constitute a legal, binding agreement. In fact, make one for your husband at your own peril. Seriously.)!

Sizes: Toddler (Ages 4 - 6; Ages 7 - 12; Teen/Small Adult; Large Adult)

Yarn: Plymouth Yarn Encore Chunky Tweed (75% Acrylic, 22% Wool, 3% Rayon; 143 yards [131 meters]/100 grams); #T599 Brown - one skein (two skeins; two skeins; two skeins; two skeins)

A closer look at the face hole.
Filled by one of the cutest little faces.
Needles: One 16" circular needle in size US 9, one 16" circular needle in size US 10, one set of double pointed needles (dpns) in size 10, and one 24" circular needle in size US 10 if you're knitting size 7 - 12 or larger

Notions: Tapestry needle, stitch marker

Gauge: 14 stitches = 4 inches on size 10 needles 

So let's get started! Using your 16" size 10 circular needle, then, cast on 64 (68; 72; 76; 80) stitches, place marker, and join in round. Then we'll knit the following edging rows:

Edging Rows 1 - 3: purl

And once those bad boys are done, knit 2" (3.5"; 5"; 7"; 9") in stockinette. Switch to your size 9 needle, and we'll do a few ribbing rows before we move on to the hood, like so:

Wednesday, August 12, 2015

Interrupted Stripe Cowl

Interrupted Stripe Cowl

Sometimes I want to make a fancy-pants project with an intricate stitch pattern and a lot of shaping. And sometimes I just want to make a basic, straightforward cowl while I watch bad television and put up my feet. The Interrupted Stripe Cowl is just such a project, using three colors of worsted weight yarn and nothing more complicated than your basic knit and purl. And the best part is that it still looks (at least a little bit) fancy!

Yarn: Berroco Fuji (38% Silk, 25% Cotton, 22% Rayon, 15% Nylon; 125 yards [115 meters]/50 grams); #9203 Sandy - one skein (color A), #9247 Pacific - one skein (color B), & #9263 Deep Sea - one skein (color C)

A close-up of the stripes. Interrupted.
Needles: One 16" circular needle in size US 7

Notions: Tapestry needle, stitch marker

Gauge: 20 stitches = 4 inches

So let's make a cowl! Using your color A yarn, then, cast on 110 stitches, place marker, and join in round. And then we'll continue like so: 

Row 1: using color A, knit

Row 2: using color A, purl

Wednesday, August 5, 2015

Ribbon Cable Socks

Ribbon Cable Socks

It's been days, at least, since I last mentioned my obsession with Malabrigo yarn. Therefore I'll this opportunity to say it again: I am obsessed with Malabrigo yarn. Especially this lovely Arroyo fiber, a sport-weight superwash that, for me at least, knit up slightly smaller than gauge. And speaking of gauge, these socks are designed for a sport-weight fiber, but you will, as always with something as finicky as socks, want to check your gauge. And remember that your dpn knitting will probably look better on a thicker fiber knit with smaller needles than the opposite, so I would definitely try to gauge down a slightly larger fiber before I'd try to gauge up a finer fiber. Am I making any sense here? Feel free to hit me up with questions in the comments; in the meantime, let's get to the pattern.

Update: Please note that I updated gusset rows 6 & 12 and body rows 2 & 8 on May 31, 2017. :)

Sizes: adult small (adult medium; adult large) (for the record, small corresponds to the following US shoe sizes: women's 5 - 7 and men's 4 - 6, medium corresponds to women's 8 - 10 and men's 7 - 9, and large corresponds to women's 11 - 14 and men's 10 - 13)

Yarn: Malabrigo Arroyo (100% Superwash Merino Wool; 335 yards [305 meters]/100 grams); #046 Prussia Blue - one skein

A better view of the ol' snockerinos.
Not that anybody calls them that.
Needles: One set of double pointed needles in size US 4, cable needle (cn) or dpn for cabling

Notions: Tapestry needle, stitch holder or scrap of yarn for holding stitches

Gauge: 24 stitches = 4 inches in stockinette

So let's make some socks! Of course, before we get to that, I should mention that I'm using Ann Budd's delightful Getting Started Knitting Socks (Getting Started series) for the sizing and basic design elements of these socks, as well as a couple of Ribbon Stitch cables from page 245 of Barbara G. Walker's A Treasury of Knitting Patterns for the stitch pattern. And now that that's covered, let's actually make those socks!

First, then, using a Long-Tail or an Old Norwegian Cast-On (for stretch) and your dpns, cast on 48 (52; 56) stitches, divide between 3 dpns as follows: 15, 18, 15 ([17, 18, 17]; [19, 18, 19]), and join in round. And since we're getting straight to the pattern, we'll need the following notation:

Wednesday, July 29, 2015

Jardin Cowl

Jardin Cowl

Okay, I've committed a cardinal knitting sin with this cowl. Namely, I've called for two skeins even though I BARELY needed any of the second one to complete it. However, I just couldn't bear to finish this brightly colored beauty early, so I sucked it up and went for the second hank. On the plus side, that means that those of you using a different yarn for the Jardin Cowl will only need about 200 yards (and could probably squeak by at 175 as well). And if you want to use the same yarn, well, you'll face the same choice I did; quit early with one skein or find another use for what's left over (which, let's face it, you'll almost certainly be seeing sooner or later on this site anyway).

Yarn: Cascade 220 Sport (100% Peruvian Highland Wool; 164 yards [150 meters]/50 grams); #8910 Citron - two skeins

A better look at the cables.
Pretty little things, aren't they?
Needles: One 16" circular needle in size US 6

Notions: Tapestry needle, three stitch markers

Gauge: 22 stitches = 4 inches

So let's get started! Using your circular needle, cast on 148 stitches loosely. Then we'll knit one marker placement row, as follows:

Marker Placement Row: k62, place marker, (p2, k9) twice, p2, place marker, knit until end of round

And once that little beast is done, we'll move straight to our pattern, which incorporates a strip of Round Link Cables from page 132 of Barbara G. Walker's Charted Knitting Designs: A Third Treasury of Knitting Patterns, as well as some decreases for shaping. So first we'll define our terminology, as follows:

round link cable (rlc): slip 6 stitches to cn and hold in front, k3, then slip the middle 3 stitches (of the 9 total) from cn back to left-hand needle; move cn with final 3 stitches to the back of the work; k3 from left-hand needle, then k3 from cn

And then we'll work like so:

Wednesday, July 22, 2015

Fun Lance Hat

Fun Lance Hat

Yes, the title of this pattern is a bit tongue-in-cheek. In fact, I named it for my brother-in-law, Lance, who was sad to discover that the Fan Lace Hat was not actually called the Fun Lance Hat, as he initially thought. But since I'm sending him this bad boy for the upcoming winter, I thought it would be a perfect name for this attractive, unisex hat. A word of warning, however - this hat may be less fun to knit than it is to wear if you're not handy with a cable needle, since you'll be cabling every other row. On the flip side, that just gives you an opportunity to learn to cable without a cable needle, if you're ready to pick up a new skill!

Yarn: Malabrigo Rios (100% Merino Superwash; 210 yards [192 meters]/100 grams); #43 Plomo - one skein

The finish. It's handsome, no?
Needles: One 16" circular needle in size US 5, one 16" circular needle in size US 7, one set of double pointed needles (dpns), also in size US 7, and one cable needle (cn)

Notions: Tapestry needle, stitch marker

Gauge: 20 stitches = 4 inches on size 7 needles

So let's make a fun (and fancy) Lance hat, shall we? To get started, then, using your size US 5 circular needle, cast on 112 stitches, place marker, and join in round. Then we'll knit some ribbing rows as follows:

Ribbing Row: * (p2, k2) three times, p2; rep from *

Knit this ribbing row 8 times. Then, switch to your size 7 circular needle, and we'll begin the main pattern, which includes panels of Wave of Honey Stitch from page 272 of Barbara G. Walker's A Treasury of Knitting Patterns. To work it, we'll use the following notation:

front cross (fc): slip 1 stitch to cn and hold in front; k1; k1 from cn

Wednesday, July 15, 2015

Three Two One Cowl

Three Two One Cowl

If I haven't dated my stash yet, then this project is sure to do it; as far as I can tell, this yarn was discontinued before my first child was even born (but here's a list of suitable replacements). So here's hoping you have a few skeins of your own oldie-but-goodie buried deep in a drawer that you can use to make this lovely cowl, which uses three colors and two patterns to create one fantastic look!

Yarn: Cascade Yarns Cotton Rich DK (64% Cotton, 36% Nylon; 135.60 yards [124 meters]/50 grams); #6313 Berry - one skein (color A), #???? unknown color (but it's the middle one in the cowl, and therefore color B), & #6377 Lavender - one skein (color C)

Needles: One 16" circular needle in size US 6

Notions: Tapestry needle, stitch marker

Gauge: 22 stitches = 4 inches

So let's get to this! First, then, using your color A yarn, cast on 120 stitches, place marker, and join in round. Then we'll get immediately to the pattern, which goes as follows:

Rows 1 & 2: * (k2, p2) 3 times, (k1, p1) 6 times; rep from *

Rows 3 & 4: * (k2, p2) twice, k2, (p1, k1) 6 times, p2 *

Rows 5 & 6: * (k2, p2) twice, (k1, p1) 6 times, k2, p2 *

Rows 7 & 8: * k2, p2, k2, (p1, k1) 6 times, p2, k2, p2 *

Rows 9 & 10: * k2, p2, (k1, p1) 6 times, (k2, p2) twice *

Wednesday, July 8, 2015

Tropical Twist Hat

Tropical Twist Hat

First off, I have to say it: I've been having a great time taking my knitting photos in my yard, even if my neighbors now think I'm nuts (and they definitely do). But I don't care, because the Tropical Twist Hat looks great out in the wild. Sure, it's nothing fancy - just some alternating cables - but it's a nice, clean, unisex design that takes variegation well. And sometimes, that's all you need!

Yarn: Cascade Yarns 220 Superwash Paints (100% Hand Painted Superwash Wool; 220 yards [200 meters]/100 grams); #9859 Tropical Punch - one skein

Needles: One 16" circular needle in size US 6, one set of double pointed needles (dpns), also in size US 6, and one cable needle (cn) or dpn for cabling (or you can always cable without a needle, if you'd prefer)

Notions: Tapestry needle, stitch marker

Gauge: 22 stitches = 4 inches

So let's make a hat! First, then, using your circular needle, cast on 120 stitches, place marker, and join in round. If you want to get really fancy, you could knit the first five or six rows in a smaller gauge needle to create a tighter brim, but it's certainly not necessary. Either way you do it, we'll get straight to the main pattern, after a little notation as follows:

front cross (fc): slip 2 stitches to your cn and hold in front; k2; k2 from cn

left twist (lt): with right-hand needle behind left-hand needle, skip one stitch and knit the second stitch in back loop; then insert right-hand needle into the backs of both stitches and k2tog-b (knit two together through back loops, inserting right needle from the right)

And now that we've covered that, let's get to it!

Rows 1 & 2: * p1, k4, p2, k4, p1; rep from *

Row 3: * p1, k4, p2, fc, p1 *

Rows 4 - 8: * p1, k4, p2, k4, p1 *

Wednesday, July 1, 2015

Pollyanna Purse

Pollyanna Purse

I've been itching to do another bag ever since I finished the Funner Summer Beach Bag, in large part because I've been bursting with design ideas. And I'm pleased to report that the Pollyanna Purse represents many of them, including faux i-cord edgings in both the strap and the sides and a seamless design. Long story short, it's both sturdy and cute and a reasonably easy knit despite its kinda-fancy design features.

Yarn: Lily Sugar 'n Cream (100% Cotton; 120 yards [109 meters]/70.9 grams); #01215 Robin's Egg - 2 skeins (color A), and #01322 Lilac - 1 skein (color B)

A closer picture of the front middle of the purse.
That's a thing, right? The "front middle"?
Needles: One 24" or longer circular needle in size US 7, one set of straight needles, also in size US 7, and one set of double pointed needles (dpns), also in size US 7, as well as size US 9 or 10 needles for provisional cast on

Notions: Tapestry needle, 6 stitch markers

Gauge: 20 stitches = 4 inches in stockinette on size 7 needles

So let's get started! First, then, let's discuss the structure of this bag - you'll begin by knitting the bottom of the bag & strap (which are connected in a continuous loop). Once that's done, you'll pick up stitches along the edges to create the sides of the bag. So with that in mind, using your larger needle, a provisional cast on, and your color B yarn, cast on 23 stitches loosely. Transfer work to your size 7 straight needles, and then continue as follows:

Row 1 (right side): using color B, knit

Row 2: using color B, k1, slip 3 stitches with yarn in front (wyif), p15, slip 3 wyif, k1

Wednesday, June 24, 2015

Stripes & Diamonds Scarf

Stripes & Diamonds Scarf

Right now you're probably wondering if I've gone crazy - after all, I went from making zero scarves to making two in, like, a month. But I couldn't help myself; once I realized that I could make a slipped stitch, two-color number with a quick enough color change that I wouldn't have to cut my yarn ends for each stripe, I simply had to do it. The result, of course, is the Stripes & Diamonds Scarf, which employs a basic garter edging and a slipped stitch color pattern in the center for a lovely and very graphic effect that won't leave you cursing a bajillion ends when you're done.

Yarn: Cascade Yarns Ultra Pima (100% Pima Cotton; 220 yards [200 meters]/100 grams); #3736 Ice - one skein (color A), #3727 Sky Blue - one skein (color B)

The diamond motif
Needles: Straight needles in size US 5

Notions: Tapestry needle

Gauge: 24 stitches = 4 inches

So let's get this scarf party started! First, then, using your color A yarn and your size 5 needles, cast on 31 stitches. Then knit the following set-up row:

Set-up Row: using color A, knit

Knit this set-up row 6 times (yes, this is just six rows of garter stitch). And now that that's done, we'll begin our main pattern, which is a strip of Stripes and Diamonds from page 70 of Barbara G. Walker's A Second Treasury of Knitting Patterns, as well as some garter stitch. As a side note, the pattern might look long, but it's super easy to remember. So let's proceed as follows:

Row 1 (right side): using color B, k15, slip 1 stitch with yarn in back (wyib), k15

Row 2: using color B, k10, p5, slip 1 wyif, p5, k10

Wednesday, June 17, 2015

Honey Cowl

Honey Cowl

I know summer hasn't even technically begun yet, but I figure there are at least a few of you who are already planning for fall. With that in mind, the Honey Cowl is made from a worsted-weight cotton-mix yarn and worked on large needles to give it a little bit more of a relaxed appearance. And while it might be difficult to tell from the pictures, the basketweave pattern that I've chosen for the main design is also a mesh, which gives this design a very unique look. Long story short, this cuddly cowl is perfect for the shoulder seasons, and would work well in most cotton- or acrylic-based worsted weight yarns!

Yarn: Berroco Remix (30% Nylon, 27% Cotton, 24% Acrylic, 10% Silk, 9% Linen; 216 yards [200 meters]/100 grams); #3953 Burnt Orange - one skein

A closeup of the basketweave.
Plus some really terrible lighting.
Apologies.
Needles: One 16" circular needle in size US 10.5 (there are a lot of stitches to begin with, so if you don't like knitting on full circulars you might want to start with a 24" or a 20" instead), cable needle (cn)

Notions: Tapestry needle

Gauge: 17 stitches = 4 inches on size 8 needles

So let's get started! First, then, cast on 119 stitches, place marker, and join in round. Then, we'll knit a marker placement/set-up row, as follows:

Marker Placement Row: p16, place marker, p1, k8, p1, place marker, p67, place marker, p1, k8, p1, place marker, purl until end of round

And now, we'll begin incorporating our main pattern, which is Open Basketweave Mesh from page 252 of Barbara G. Walker's Charted Knitting Designs: A Third Treasury of Knitting Patterns, a cable, and some decreases. Oh, and we'll need the following notation:

rt (right twist): knit two together, leaving stitches on left-hand needle; next, insert right-hand needle from the front between the two stitches just knitted together, and knit the first stitch again. Finally, slip both stitches from left-hand needle together

lt (left twist): with right-hand needle behind left-hand needle, skip one stitch and knit the second stitch in back loop; then insert right-hand needle into the backs of both stitches and k2tog-b (knit two together through back loops, inserting right needle from the right)


bc (back cross): slip next 2 stitches to cn and hold in back, k2, k2 from cn

fc (front cross): slip next 2 stitch to cn and hold in front, k2, k2 from cn

And now that that's out of the way, let's proceed as follows:

Wednesday, June 10, 2015

Floral Mesh Bonnet

Floral Mesh Bonnet

I can proudly state that this is my first-ever matching product; in fact, it goes with last week's design, the Floral Mesh Scarf. And while I haven't ever used the same stitch pattern week-to-week before, I just couldn't resist with this one since, as soon as I saw the scarf completed, I knew it had to have a bonnet. I also sized it for children through adults for a super-fun, multi-seasonal look that will fit most everyone in your family. Why? Well, 'cause they're all going to want one!

Sizes: Child's Small (Child's Large; Teen/Adult Small; Adult Large) (as far as the child's small and the child's large are concerned - think maybe 2 - 5 years for the small, 6 - 12 or so for the large)

Yarn: Schoeller + Stahl Pantino (60% Cotton, 40% Acrylic; 98 yards [90 meters]/50 grams); #0007 Egg Yolk (that color name is still made up) - 2 skeins

A close-up of the pattern.
I left in the creepy eyes because I could.
Needles: Straight needles in size US 5, 16" circular needle in size US 5, and one set of dpns, also in size 5

Notions: Tapestry needle, two stitch markers

Gauge: 17 stitches = 4 inches

So let's make a hat, shall we? First, then, we'll start with the brim of this bonnet, which is knit back and forth. So, using your straight needles, cast on 84 (98; 112; 126) stitches loosely. Then we'll knit a few edging rows, as follows. Notice you'll be placing two stitch markers on your third edging row.

Edging Row 1 (right side): purl

Edging Row 2: knit

Wednesday, June 3, 2015

Floral Mesh Scarf

Floral Mesh Scarf

I hope you all are holding onto your butts, because this week's post is a big one! Well, that may be overstating things, but since this purty little number is only my second scarf I feel like it should receive some recognition. And even if it doesn't, I should also mention that it has a fun-to-knit and relatively quick-to-learn lace pattern that pops beautifully, and that its shape features tapered ends so it's a bit more of a challenge than just a rectangle. Basically, this bad little mamma jamma would make a nice addition to your scarf collection, or a lovely gift.

* As of November 25, 2015, I have added a second chart to correspond better with the given row numbers. You can find it right below the first!

You also have two choices for a matching hat: the Floral Mesh Bonnet, or the Floral Mesh Beanie!

Yarn: Schoeller + Stahl Pantino (60% Cotton, 40% Acrylic; 98 yards [90 meters]/50 grams); #0007 Egg Yolk (I made up that color name) - 3 - 4 skeins, depending on finished length

A close up of the pattern
and the decrease end of the scarf
Needles: Straight needles in size US 5

Notions: Tapestry needle

Gauge: 17 stitches = 4 inches

So let's make a scarf, people! First, then, I should mention that I actually charted this pattern, so you can find it down at the bottom. Also, since I charted the cast on, the pattern, and the decrease, you could knit almost exclusively from that (except I didn't chart the wrong side rows. The edge of the scarf has two stitches in garter - otherwise, the whole back is purled). Of course, I'll also spell things out. With that in mind, cast on 5 stitches loosely. Then we'll work some set-up rows, as follows:

Set-up Row 1 (wrong side): k2, purl until you have 2 stitches left in row, k2

Set-up Row 2: k2, m1l, knit until you have 2 stitches left in row, m1r, k2 (+2 stitches)

Knit set-up rows 1 & 2 until you have 13 stitches on your needle and you've just completed row 1 of the pattern. Now we're going to begin working in some of our pattern, which is Floral Mesh from page 218 of Barbara G. Walker's A Fourth Treasury of Knitting Patterns, as follows:

Set-up Row 3 (right side): k2, m1l, k2, k2tog, yo, k1, yo, ssk, k2, m1r, k2 (15 stitches)

Set-up Row 4 and all wrong-side rows: k2, purl until you have 2 stitches left in row, k2

Set-up Row 5: k2, m1l, k2, k2tog, yo, k3, yo, ssk, k2, m1r, k2 (17 stitches)

Wednesday, May 27, 2015

Funner Summer Beach Bag

Funner Summer Beach Bag

Yeah, I know "funner" isn't a word. But my kids don't, and that was the inspiration for this brightly striped, cleverly constructed (in my opinion, at least!) bag. Designed seamlessly with faux i-cords for structure and a fun lace pattern, this is one of the sturdier and prettier knit bags you'll find. Knit it, and you'll make your summer more fun. Or, you know, go to the water slides or something like that instead. Your call. :)

Yarn: Plymouth Yarn Whitney (91% Cotton, 9% Nylon; 87 yards [89 meters]/50 grams); #1001 Natural - three skeins (color A), #1009 Cranberry - two skeins (color B)

The lace pattern. So purty!
Needles: One set of double pointed needles in size US 8, one 16" circular needle in size US 8

Notions: Tapestry needle, 9 stitch markers

Gauge: 17 stitches = 4 inches 

So let's make a bag! First, then, I should mention that any time you're slipping stitches in this bag, you're pulling the yarn tight behind them. This will help to create that faux i-cord rib, and the edges of the strap. I should also mention that this bag is worked bottom-up. So with that in mind, using your color A yarn and your dpns, cast on 8 stitches loosely, divide evenly between four dpns, and join in round. Then we'll work a few set-up rows, as follows:

Set-up Row 1: using color A, * p1, m1r, p1; rep from * (+4 stitches)

Set-up Row 2: using color A, * p1, slip 1 with yarn in back (wyib), p1 *

Set-up Row 3: using color A, * p1, m1r, k1, m1l, p1 * (+8 stitches)

Once these three set-up rows are done, we'll knit a marker placement row, as follows:

Wednesday, May 20, 2015

Butterfly Eyelet Hat

Butterfly Eyelet Hat

As a woman who has had short hair the majority of her life, I rarely find myself needing a very slouchy hat (and thus often design beanies). But sometimes I remember that the rest of you may very well have crazy, messy, big hair that needs a big ol' hat to go on top of it. And that's why I designed the Butterfly Eyelet Hat, which has enough stretch and length to fit over a long, luscious 'do (or just to accent a short one). Anyway, if there's anyone out there who likes the pattern but would prefer a snugger fit to their hat, just hit me up in the comments and we'll see what we can do!

Yarn: Cascade 220 Superwash (100% Superwash Wool; 220 yards [200 meters]/100 grams); #1940 Peach – one skein (color A) and #910A Winter White - one skein (color B)

The pattern. Cute little eyelets, eh?
Needles: One 16" circular needle in size US 5, one 16" circular needle in size US 7, one set of double-pointed needles (dpns), also in size US 7

Notions: Tapestry needle, stitch marker

Gauge: 20 stitches = 4 inches in stockinette on size 7 needles

So let's make a hat! First, then, using your size 5 needle and your color A yarn, cast on 112 stitches, place marker, and join in round. Then we'll knit the following ribbing row to get started:

Ribbing Row: using color A, * k2, p2; rep from *

Wednesday, May 13, 2015

Cherry Blossom Cowl

Cherry Blossom Cowl

Holy moly. It's been a bit of a stressful morning; not only was the baby unwilling to eat or sleep, but he also spent an hour or two screaming nonstop. Finally, after carrying him around and trying to make him happy all morning, I needed some lunch, so I heated up some pizza. And despite the fact that he had rejected cereal, strawberries, and a squish bag full of baby food, he went DOWNTOWN on the pizza, and now he's happy as a clam. Clearly, he needs to learn how to talk.

And speaking of talking, I should say a word about this piece! First, the name - it's a late spring here in Wisconsin, and the cherry trees are spreading those delightful, pale pink blossoms that I love so much. The color of this cowl and the bobbles reminded me of them. And yes, you're right - it is my first time knitting bobbles! Turns out it's not so hard. So if you haven't done it before, this lovely, lightweight piece is a great place to start!

Yarn: Cascade Yarns Sateen (100% Acrylic; 300.7 yards [275 meters]/100 grams); #7 Ballerina Pink - one skein

Needles: One 16" circular needle in size US 5

Notions: Tapestry needle, three stitch markers

Gauge: 22 stitches = 4 inches

Anyway, let's get started! First, then, we'll cast on 152 stitches loosely, place marker, and join in round. As a note, this piece will be fitting pretty close to the head (my finished piece is about 20" in circumference, unstretched). And while I have no trouble getting it over my 22" noggin, you may want to cast on a few extra stitches if you have a larger head. Just let me know if you need help modifying the pattern! Anyway, let's continue. It's time to knit the following set-up row, to get started:

Set-up Row: p21, place marker, p110, place marker, purl until end of round

And once this bad boy is out of the way, it's time to begin on our main pattern, which incorporates a large section of Field of Wheat from page 278 of Barbara G. Walker's A Second Treasury of Knitting Patterns and some decreases, since I am obsessed with a nicely-shaped cowl. Anyway, to continue, you'll need the following notation:

mb (make bobble): (k1, yo, k1, yo, k1) in one stitch, which will turn one stitch into five; turn and k5; turn and p5; turn and k1, slip 1-k2tog-psso, k1; turn and p3tog, which completes bobble. When you reach this stitch again on the following row, knit through the back loop of the bobble stitch rather than the front loop. 

And now that that's out of the way, let's get knitting!

Wednesday, May 6, 2015

Cute & Cabled Baby Bib

Cute & Cabled Baby Bib

I have had this yarn in my stash for an embarrassingly long time - I bought it over a year ago with the intention of turning it into a cowl, and then promptly forgot about it. When I ran across it at the end of a hectic week, however, I realized that it would be perfect for a quick-knitting project like this one. So I conceived of the Cute & Cabled Baby Bib, which is thick, cute, detailed but not too difficult to knit, and works up in a snap. Also, I'm pretty sure you could get two bibs out of one skein, although I haven't tried it (yet).

Yarn: Plymouth Yarn Jeannee Chunky (51% Cotton, 49% Acrylic; 106 yards [97 meters]/100 grams); #10 Blue - one skein

A close-up of the side detail.
After a long debate, I used
decreases for shaping
instead of short rows.
Needles: One set of straight needles in size US 10 and two double pointed needles (dpns), also in size US 10, for working the i-cord ties

Notions: Tapestry needle, two stitch markers

Gauge: 14 stitches = 4 inches 

So let's make a bib! First of all, then, using your size 10 needles, cast on 29 stitches loosely. Then, we'll knit the following two set-up rows: 

Set-up Row 1 (wrong side): knit

Set-up Row 2: p9, place marker, p11, place marker, purl until end of row 

And once those rows are done, it's time to begin our pattern, which includes some shaping and also a strip of "Opening" Double Cable from page 113 of Barbara G. Walker's A Treasury of Knitting Patterns. At any rate, we'll be continuing like so:

Row 1 (wrong side): purl until you reach first marker, slip marker, k2, p7, k2, slip marker, purl until end of row

Wednesday, April 29, 2015

Feathered Arrow Headband

Feathered Arrow Headband

One of knitting's greatest challenges (in my opinion, at least) is finding a good way to use your yarn scraps. I never have the heart to throw them away, after all, and then I never have quite enough yarn to do anything really spectacular with my leftovers. Luckily, the humble headband can be a great solution to this problem - quick, fun, and gratifying to knit, they're also highly wearable and a great gift. Case in point: the Feathered Arrow Headband, which uses less than 50 yards of yarn and is easy to customize for teens to adults.

Yarn: Patons Classic Wool (100% Pure New Wool; 210 yards [192 meters]/100 grams); #202 (Cream) - one skein
The pattern.
Subtle, but niiiiice.


Needles: straight needles in size US 8, straight needles in size US 10 (for provisional cast-on)

Notions: Tapestry needle, stitch marker

Gauge: 18 stitches = 4 inches

So let's make a headband! First, then, using your size 10 needles and a provisional cast on, cast on 17 stitches loosely. Then, we'll move straight to our size US 8 needles and our main pattern, which is Expanded Feather Pattern from page 194 of Barbara G. Walker's A Treasury of Knitting Patterns, and goes as follows:

Wednesday, April 22, 2015

Sea & Shore Cowl

Sea & Shore Cowl

When I first started knitting this piece, it seemed very timely; the tulips were starting to bloom, and the weather was finally heating up. I even took the flannel sheets off my bed. Of course, every action has an equal and opposite reaction, so now it's freaking snowing. Before I start complaining about the cold spring, however, I should mention some important stuff - mainly, that this cowl is worked in two colors of sock weight yarn on size US 5 needles to give it extra airiness. Because the warm weather will arrive eventually, right?

Yarn: Schachenmayr Original Egypto Cotton (100% Cotton; 197 yards [180 meters]/50 grams); #00174 Leaf Green - one skein (color A) and #00166 Mint - one skein (color B)

A close up of the piece
Needles: One 24" circular needle in size US 5

Notions: Tapestry needle, three stitch markers

Gauge: 30 stitches = 4 inches on size 2 needles 

So let's do this thing! First, then, using your color A yarn, cast on 183 stitches loosely, place marker, and join in round. Then we'll knit a couple of set-up rows, as follows:

Set-up Row 1: using color A, p16, place marker, p152 (or until there are 15 stitches left in round), place marker, and purl until end of round