Thursday, September 28, 2017

Nikki's Slouch Hat

Nikki's Slouch Hat
Nikki's Slouch Hat
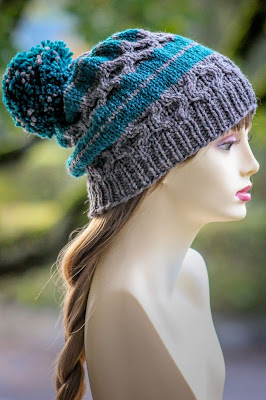
pictured in size Adult Small/Medium

Here's another pretty hat with a simple story: my friend Nikki was struggling to find a nice slouch hat here in Switzerland. Meanwhile, I had just bought some lovely yarns at my local store knowing that they would be *perfect* for something. And what do you know, a few conversations and copious swatching later, Nikki's Slouch Hat was born! With a combination of cabled panels (for squish) and simple striping (for ease), this hat has texture and charm galore!!!

Sizes: Adult Small/Medium (Adult Medium/Large)

Yarn: Lana Grossa Landlust Merino 120 (100% Virgin Wool; 131 yards [120 meters]/50 grams); #105 Taupe - one skein (two skeins) (color A), & #116 Petrol - one skein (both sizes) (color B) (side note: I didn't have a full 10% of my color A skein left over when I finished this hat, so I suppose it's possible that you'll need two skeins to finish the small size too. If you get in that situation, however, I suggest you fudge it and finish with color B, especially if you're gonna add a pompom!)
Nikki's Slouch Hat
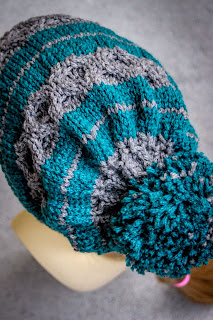
A look at the back.
Needles: One 16" circular needle in size US 10.5, one 16" circular needle in size US 11, one set of double pointed needles (dpns), also in size US 11, and one cable needle (cn) or extra dpn for cabling (or cable without a cable needle, if you like!)

Notions: tapestry needle, stitch marker

Gauge: 14 stitches = 4 inches on size US 11 needles

So let's make a hat! Using your size US 10.5 needle and your color A yarn, then, cast on 76 stitches (80 stitches) loosely, place marker, and join in round. Then we'll work in a basic ribbing, as follows:

Ribbing Row: using color A, * k1, p1; rep from *

Knit this ribbing row until ribbing measures roughly 2" (2.5"-3"), and then transfer work to your size US 11 circular needle. Then, we'll work the following transition row. Notice the row is different for the two different sizes.
Thursday, September 7, 2017

Follow Your Arrow Shawl

Follow Your Arrow Shawl

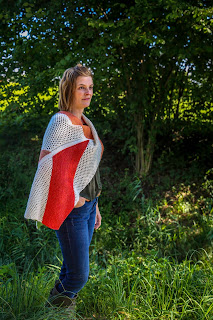
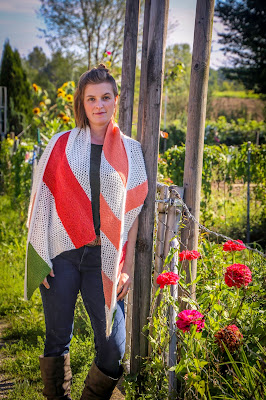
First and foremost: a quick thanks to Nikki from Zender Studios for taking these photos for me; you're a doll for helping (and lending me your shoes for the pictures)! And with that being said, let's get to some details about the pattern...

... like the fact that I should probably apologize for the fact that I made this delightful shawl using mill ends that I bought at the Edinburgh Yarn Festival, which means that I can't tell you *exactly* what's in the thing. However, I CAN tell you that I carefully measured everything I used, and added a 10% allowance to the values below, so you can find grams/yards/meters for every color, which should help you to choose your own materials (just remember: having the appropriate yardage is more important than the weight, especially for colors D & E [since those are my heavier weight yarns]). I also encourage you to view the pattern as a jumping-off point for your own color ideas; overall, it's made of 10 sections with 2 colors apiece, so the possibilities abound!

Speaking of the fact that it's 10 sections (and kite shaped, when laid out!), I should also mention that this pattern has not been tech edited, and since it's one of my lengthier designs I welcome any questions or comments about errors that you may find. Ultimately, it's not terribly complicated since I used the same pattern all over (a combination of garter and a mesh pattern), but once you add color choices and increases and decreases to the thing, I'm certain I slipped in my notation at least a few times. So again, I'm very happy to help with any issues you may find; in fact, I've even labeled each section of the design so that it's easier for you to identify any problems to me (just give me section and row number and we'll be good to go!).

Oh, and I know I'm being verbose today, but one last thing; I noticed, as I worked this, that it's easier to make knitting errors in the sections in which you're beginning with your color A, or the mesh pattern. If you notice that your counts are off, don't despair! This mesh pattern is VERY forgiving of errors, and as long as you correct your stitch counts by the end of each section you will be able to proceed, even if you've made a mistake (and, again, I highly doubt you'll find your error ever again). All in all - bon courage, and I hope you like your finished shawl as much as I like mine (IT'S AMAZING!). Also, if one of you actually makes it in the target yarn (ideally John Arbon Textiles Knit by Numbers 4 Ply) please send me pictures, so I know what it would look like if I didn't have such a strong attraction to the mill ends bin. Of course, even if you make it with a bunch of odds and ends like I did, I think it will turn out great just the same!!! :) (other ideas: scale it up with DK weight yarn and the appropriate sized needles if you'd like, or even worsted it you want a real sleeping bag of a shoulder wrap. and again, send pics!)

Finished Size: 75" long in total, 28" inches wide at the widest point

Yarn: John Arbon Textiles mill ends; White (Alpaca Delight, 70% Alpaca, 30% Merino; Color A; 120 grams, or roughly 510 meters/558 yards), Green (Knit by Numbers 4 ply, 100% Merino; Color B; 8 grams, or roughly 32 meters/35 yards), Orange/Green (unknown fiber; Color C; 30 grams or roughly 120 meters/132 yards), Dark Orange/Red (100% Merino; Color D; 58 grams or roughly 145 meters/159 yards), Light Orange (Knit by Numbers DK, 100% Merino; Color E; 100 grams or roughly 250 meters/274 yards)

Follow Your Arrow Shawl
From the side
Needles: One pair of needles in size US 3 (3.25 mm) (I used a 32" circular needle, but I think you should be able to make this on straights if need be, although they will get quite crowded!)

Notions: tapestry needle, two stitch markers

Gauge: I am a terrible person and used two different weight yarns in this shawl, as mentioned. Colors A, B, and C are 28 stitches = 4 inches on US 2 needles, the rest are 24 stitches = 4 inches on size US 4 needles. I am loosely averaging this to mean 26 stitches = 4 inches on US 3 needles for all. Like I said, terrible!

So let's get started! Using your color B yarn, cast on 2 stitches. Then, right next to those 2 stitches, use your color A yarn to cast on 3 stitches as well (at this point, that means that these two sets of stitches are not connected). Then, using intarsia color joins for all color changes, we'll begin our first color section like so:

Thursday, August 17, 2017

Single Stripe Mittens

Single Stripe Mittens
pictured in size small

Sometimes I buy yarns because they BEG me to bring them home, all puppy dog eyes and soft squishiness. Sometimes I buy yarns because they're on great sale, and I'm my mother's daughter. And sometimes (like this time) I buy yarns because I happen to wander into a LYS in Lithuania and it's so small that I feel like I HAVE to buy something, but they stock almost exclusively Turkish and Italian yarns (so I can't find anything local) and nothing really catches my eye. Such was the case for me recently, until I finally spotted this nice alpaca. And then, of course, I used it for this fun design, which avoids any broken stripes by nestling the color change against a two-stitch stripe up the side rather than placing it at the beginning of the round.

Oh, and as a side note, this yarn is slightly non-standard sized, for recommended needle size and gauge, and you will probably find more yarns that give you 20 stitches per 4 inches on a slightly larger needle. If that's the case, simply adjust your needle size to gauge as needed. :)

Updated February 6, 2021

Sizes: Small Adult (Medium Adult; Large Adult) (the small is for a hand roughly 7 1/2" - 8" in circumference at the base of the thumb and 7" from base of palm to fingertips, and the large for a hand roughly 8 1/2" - 9" in circumference at the base of the thumb and 8" from base of palm to fingertips - and finally, go medium if you're between)

Yarn: Alvita Alpaka (100% Alpaca; 109 yards [100 meters]/50 grams); #90 Brown - one skein (one skein; one to two skeins) (color A) & #10 Ivory – one skein (all sizes) (color B)

One mitten, near a tree. You
can just get a peek at the stripe
down the side...
Needles: one set of double-pointed needles (dpns) in size US 6, one set of dpns in size US 4

Notions: Tapestry needle

Gauge: 20 stitches = 4 inches on size 6 needles

So let's get started! Using your size 4 needles and your color A yarn, then, cast on 40 (40; 44) stitches loosely, distribute between three double pointed needles as follows: 12 stitches on first needle, 16 on second, 12 on third (12 stitches on first, 16 on second, 12 on third; 14 stitches on first, 16 on second, 14 on third) and join in round. Then we'll work some ribbing for the cuff, as follows:

Ribbing Row: * k1, p1; rep from *

Knit this ribbing row until ribbing measures roughly 2" (2.5"; 3"). Transfer work to your size US 6 needles and knit one row around. Clip your yarn tail, since we'll be changing colors halfway through our rounds. Then, we'll begin our color pattern, as follows:

Row 1: using your color B yarn, k19 (k19; k21); then, using your color A yarn, knit until end of round