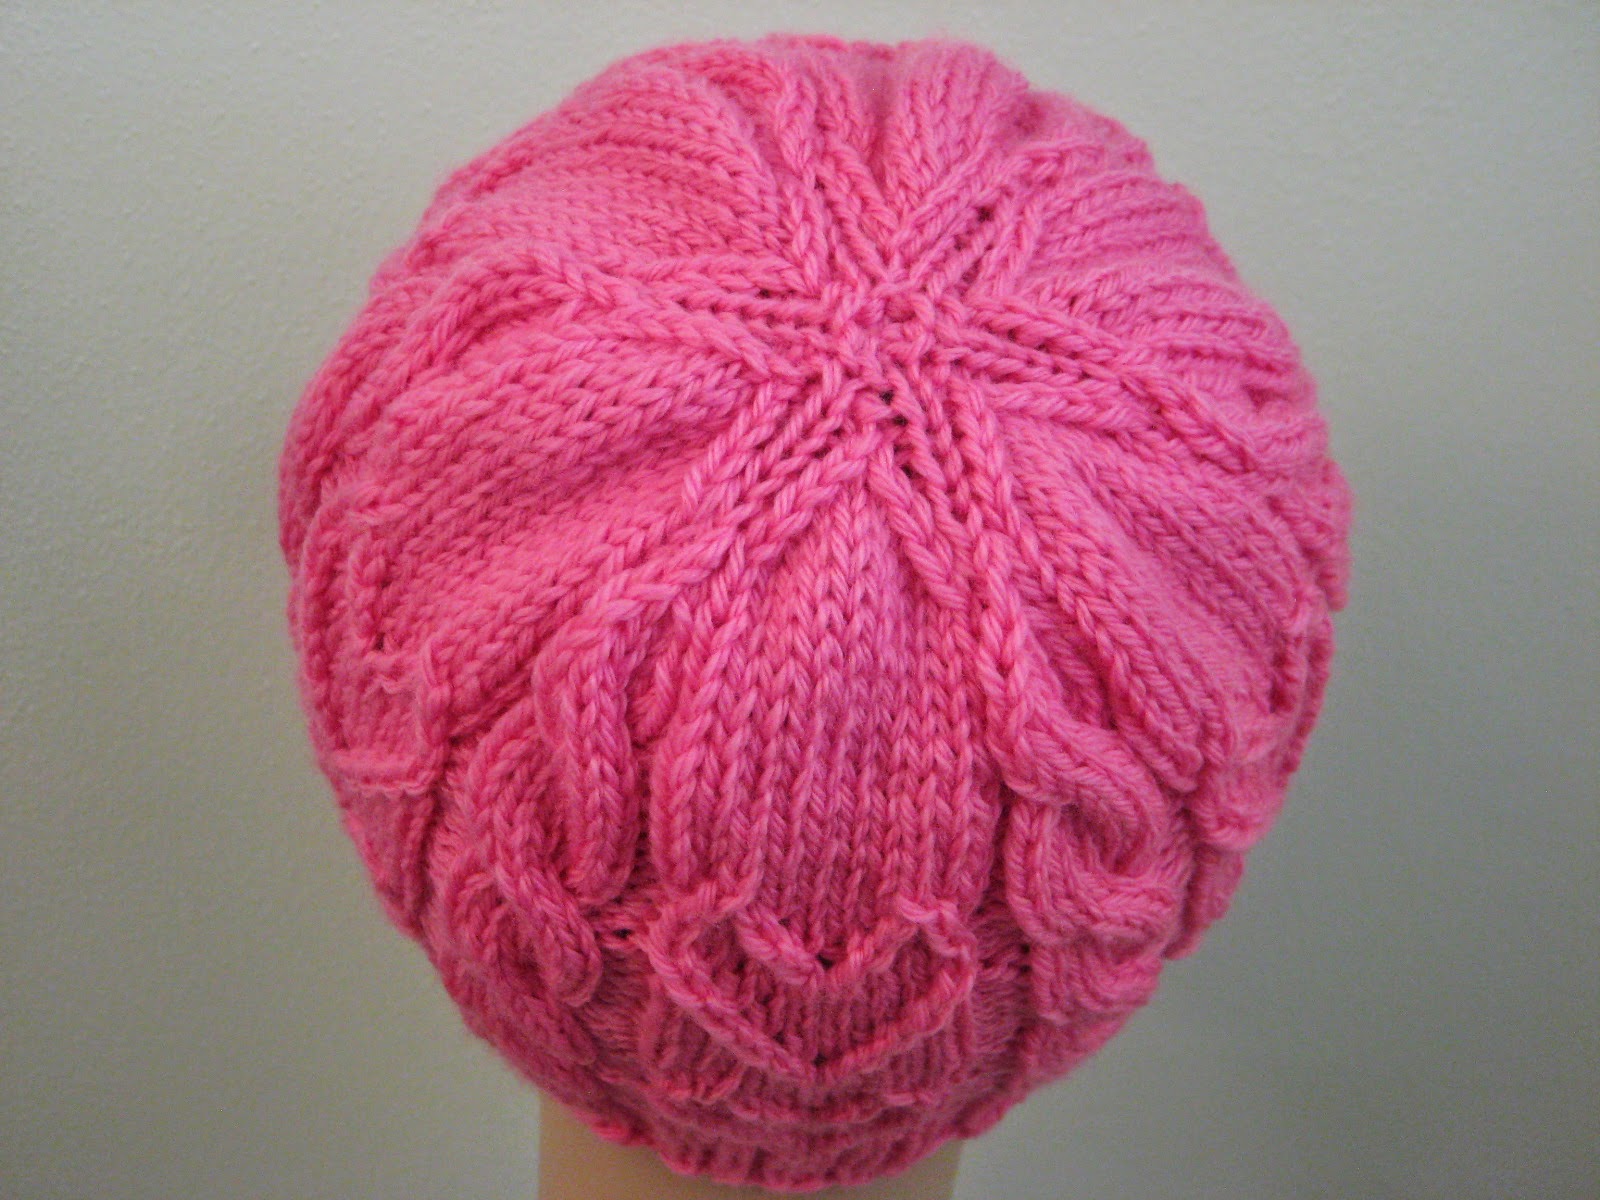
Wednesday, June 25, 2014

Wickerwork Hat

Wickerwork Hat

I stumbled across this yarn in my stash the other day and I realized that it would make the perfect gift for a friend who's about to move away. So I got right down to work and created this fun Wickerwork Hat, complete with pompom (there is a photo of it without the pompom below, in case you want to see it without). It would also make a great stash-busting holiday gift, since I think most of us have at least a skein or two of worsted-weight wool hanging around!

* Note: As of November 2, 2015, I have added a chart to this pattern using the ever-wonderful chart generator here. You can find it below. Please note, however, that I had to do some funky stuff with the charting to make it work (it should all be explained in the chart graphic, but let me know if there's a problem. Also, let me know if there's a better way to chart any of my issues, and I'll fix it! :) )

Sans pompom. In a different color, this would
make a nice man-hat as well.
Yarn: Patons Classic Wool (100% Pure New Wool; 210 yards [192 meters]/100 grams); #202 (Cream) - one skein

Needles: 16" circular needle in size US 5, 16" circular needle in size US 8, one set of double pointed needles, also in size US 8

Notions: Tapestry needle, stitch marker

Gauge: 20 stitches = 4 inches on size 7 needles

So let's get started! First, using your size 5 needle, cast on 104 stitches, place marker, and join in round. Then, knit 1.5" in the following ribbing:

Ribbing Row: k1, * p2, k2; rep from *; end p2, k1

And once that's done, we'll switch to our size 8 needles and our main pattern, which is Wickerwork Pattern from page 146 of Barbara G. Walker's A Second Treasury of Knitting Patterns. For this pattern, we'll need the following notation (you can find videos for the techniques below them):

rt (right twist): knit two together, leaving stitches on left-hand needle; next, insert right-hand needle from the front between the two stitches just knitted together, and knit the first stitch again.  Finally, slip both stitches from left-hand needle together

Monday, June 23, 2014

How to Make a Yarn Pompom

I'm getting ready to post a hat that needs a pompom, so I figured that it was finally time to suck it up and write out some pompom-making instructions. And while I know there are many methods, this is the one I think works best. So let's get started!

1. Notice my circles aren't perfect. They don't need to be!

1. Cut out two cardboard circles that are roughly 3” in diameter, and cut a 1” hole in the middle. As you’ll notice, exact precision isn’t necessary. You can also cut bigger or smaller circles, depending on how big you want your pompom to be (this one will be a shy two inches, since that's the difference between your outer circle and your inner circle, and it shrinks a little with the tight wrapping. If you make a mondo pompom, you'll want to cut a bigger center hole, since you'll need a boatload of wrapping to make it look right).

2. And now, start wrapping that sucker up!

2. Thread a long tail (3+ yards, or as much as you’re willing to use, really) of yarn on your tapestry needle, and then, holding your two cardboard pieces together, loop through center hole repeatedly, with some care not to get your end tangled up in the loops.

Wednesday, June 18, 2014

Long-Slip Striped Table Runner

Long-Slip Striped Table Runner

I'm not exactly sure why I decided to knit a table runner, but I think it was some combination of wanting to create a non-wearable knit for summer and NOT wanting to knit four whole placemats (if the baby won't even let me knit more than one coaster, you know a gaggle of placemats will never happen). Whatever my inspiration was, however, I totally dig the end result - colorful, cheerful, and functional, this table runner is a great choice if you want to keep knitting through the summer but don't want to make winter-y items. It would also make a lovely gift, if Christmas knitting is already on your mind...

A close-up of the pattern. So stripey!
Yarn: Plymouth Yarn Jeannee (51% Cotton, 49% Acrylic; 111 yards [102 meters]/50 grams); #0023 (Lavender) - two skeins (color A), #0006 (Sage) - one skein (color B), #0022 (Gray) - one skein (color C), & #0033 (Teal) - one skein (color D)

Needles: Straight needles in size 8, at least a 24" circular needle in size 6 (there's no circular knitting here, but you will need something long to pick up stitches along the edge of the runner)

Notions: Tapestry needle

Gauge: 18 stitches = 4 inches on size 8 needles

Using your color A yarn and your size 6 needles, cast on 53 stitches loosely. Then, work the following rows:

Set-up Rows 1 - 9: using color A, k1, * p1, k1; rep from *

Wednesday, June 11, 2014

Eiffel Tower Eyelet Cowl

Eiffel Tower Eyelet Cowl

So, there's not too much I need to explain about this cowl, except that it accomplishes the impossible; it makes me love both a purl-background fabric and the freakin' garter stitch, which I typically avoid like the plague (and yes, it's completely irrational how much I dislike garter stitch. I apologize to those of you who love it). It's also a simple enough design to look good with a variegated yarn, although I imagine it would pop even more with a single-color fiber. Anyway, let's cut the chitchat and head to the pattern instead!

A detail shot. See the tiny towers???
Yarn: Berroco Boboli Lace (42% Wool, 35% Acrylic, 23% Viscose; 350 yards [320 meters]/100 grams); #4366 Fondant - one skein

Needles: 24" circular needle in size 6, 20" circular needle in size 6

Notions: Tapestry needle, three stitch markers

Gauge: 24 stitches = 4 inches

So let's get started! First, then, using your 24" needle, cast on 192 stitches loosely, place marker, and join in round. And now, we'll work the bottom border, which is Swiss Ribbing from page 340 of Barbara G. Walker's A Second Treasury of Knitting Patterns. Or in knitting terms, let's begin like so:

Rows 1 - 4: * k3, p3; rep from *

Rows 5 & 6: * k1, slip 1 with yarn in back (wyib), k1, p3 *

Wednesday, June 4, 2014

Little Ladders Coasters

Little Ladders Coasters. Er, coaster...

I suppose I should begin this post with a clarification; despite the fact that I called it "Little Ladder Coasters," I only actually knit one (the yarn is leftover from the Mirage Cowl, in case you're wondering. And I could have knit many, many more). Anyway, it turns out that knitting with a new baby is not easy, and one single coaster has now become an entire week's worth of knitting. Luckily, one is all you need if you're drinking alone!

Some pattern detail... with terrible color! Whoops.
Yarn: Regia Angora Merino (65% New Wool, 25% Polyamide, 10% Angora; 219 yards [200 meters]/50 grams); #7080 Fuchsia - one skein (color A) & #7083 Teal - one skein (color B)

Needles: Straight needles in size 2

Notions: Tapestry needle

Gauge: 30 stitches = 4 inches

Using your color A yarn, cast on 30 stitches loosely. Then, we'll work the following set-up rows:

Set-up Rows 1 - 3: using color A, * k1, p1; rep from *

Set-up Row 4: using color B, knit

Wednesday, May 28, 2014

Fretted Band Cowl

Fretted Band Cowl

The explanation for this cowl is simple: I love these two yarns together, even if my husband originally thought the combination was strange. And while this piece turned out more like the Sweet Strawberry Cowl and the Sugar & Ice Cowl than I originally intended, it has enough differences to set it apart. Like the slip stitch pattern, for instance, which would also look good in more contrasting yarns.

Yarn: SMC Select Reflect (52% Viscose, 48% Cotton; 131 yards [120 meters]/50 grams); #4108 - one skein (color A), SMC Select Violena Colori (50% Cotton, 50% Modal; 109 yards [100 meters]/50 grams); color #4307 (color B)

The slip stitch pattern, closer up.
Needles: One 20" circular needle in size 6, two double pointed needles (dpns), also in size 6

Notions: Tapestry needle, two stitch markers

Gauge: 21 stitches = 4 inches

So let's get this thing started! To begin, use your color A yarn to cast on 144 stitches, place marker, and join in round. Then we'll knit a couple of edging rows, as follows:

Edging row: using color A, * k2, p2, k2; rep from *

Knit the edging row three times, and then we'll transition to our slip stitch pattern, which is a variation on Fretted Band Pattern from page 67 of Barbara G. Walker's A Second Treasury of Knitting Patterns. We'll be slipping all stitches with the yarn in the back. And we'll proceed like so:

Rows 1 & 2: using color B, knit

Tuesday, May 20, 2014

Sweetheart Beanie

Sweetheart Beanie

When it comes to making hats, I like to live dangerously. And what I mean by that, naturally, is that I like to use as much of my skein as humanly possible, like in this instance, where I knit the adult size of this hat and had about one yard of yarn left at the end. Of course, I mention this to give you a warning; while I knit this hat out of approximately 135 yards of this particular yarn, you may need more. On the plus side, if you knit both sizes, two skeins will definitely be plenty for both!

The finishing.
Sizes: Child (roughly 20" in circumference) and Adult (roughly 22" in circumference) (instructions for the Adult hat will follow those for the Child hat in parentheses)

Yarn: Cascade Yarns 220 Superwash Sport (100% Superwash Merino Wool; 136 yards [125 meters]/50 grams); #901 Cotton Candy - one to two skeins

Needles: One 16" circular needle in size US 5, one 16" circular needle in size US 6, one set of double pointed needles (dpn), also in size US 6, and a cable needle (cn) or dpn for cabling

Notions: Tapestry needle, stitch marker

Gauge: 22 stitches = 4 inches

So let's get started! Using your size 5 needle, cast on 108 stitches loosely (120 stitches for the larger hat), place marker, and join in round. Then we'll knit the following ribbing row:

Tuesday, May 13, 2014

Twin Leaf Cowl

Twin Leaf Cowl

Oh, how I love this yarn. Straight-up cotton (which, despite its difficulties, I adore), and a white base with a neon green spray paint effect, this is the type of fiber that I obsess over and that my husband makes a bit of a squicky face when I purchase. But not even he can argue with the dainty loveliness of this light, one-skein cowl and its basic but delightful pattern. Yay spring!


The twin leaf motif.
Hey, I'm a poet and I don't... yeah, never mind.
Yarn: Schoeller + Stahl Spray (100% Cotton; 153 yards [140 meters]/50 grams); #6 - one skein

Needles: One 24" circular needle in size 4, six stitch markers

Notions: Tapestry needle

Gauge: 24 stitches = 4 inches

Cast on 160 stitches, place marker, and join in round. And before we get started on the main pattern, which incorporates two panels of Twin Leaf Lace from page 210 of Barbara G. Walker's A Treasury of Knitting Patterns (which I've modified for the round), we'll knit the following set-up rows:

Set-up Row 1: * k1, p1; rep from *

Set-up Row 2: * p1, k1 *

Set-up Row 3: * k1, p1 *

Friday, May 9, 2014

Cellular Stitch Kids' Poncho

Cellular Stitch Kids' Poncho

As I'm sure I've mentioned, I have a hard time letting a house guest leave without a knit good or two. And since a friend stayed for weeks to help with our family's latest addition (who I'm sure I'll knit something for soon as well), I designed this poncho for her daughter in return. Since I was working with a variegated yarn, I tried to keep the pattern simple but appealing, and worked a basic openwork for the majority of the design with a couple of lace stripes for the shoulders. As I found out as soon as my friend's daughter put it on, however, it looks just as good with the stripes going up the front and the back of the poncho as it does with them on the shoulders!

The cellular stitch, closer up.
Sizes: Toddler (2 - 3 years); Child (4 - 7 years) (the instructions for the larger size will follow the instructions for the smaller size in parentheses)

Yarn: Plymouth Yarn Jelli Beenz (75% Acrylic, 25% Wool; 214 yards [196 meters]/100 grams); #2385 Flamingo - two skeins (if you have the 50 gram skeins instead, 3 will do you)

Needles: One 16" circular needle in size 8, one 24" circular needle in size 8

Notions: Tapestry needle, four stitch markers

Gauge: 18 stitches = 4 inches

So let's begin! Using your 16" circular needle, cast on 72 stitches loosely (80 for the larger size), place marker, and join in round. Knit 1" in a k1, p1 ribbing, and then we'll knit the following addition row:

Addition Row: * k2, m1, k1 * (larger size: * k3, m1, k2; rep from *) (96 stitches, both sizes)

And once that's done, we'll knit the following transition row, in order to place our extra stitch markers. It is the same for both sizes.

Tuesday, May 6, 2014

Mirage Cowl

Mirage Cowl

When I first bought this yarn, I had no clue how I was going to use it (well, I knew I would use the two shades together - I love this color palette). And then I made the Slip-Stitch Mesh Fingerless Gloves and matching hat and the Water Lilies Cowl, and I saw a nice opportunity to combine variations on the slip stitch patterns I used for those pieces to maximum effect. Long story short, while the pictures don't quite do the front slip stitch pattern justice, color-wise (the pink shows up behind the teal a bit more in person than it does in the photos), the combination of the two is quite striking in this closer-fitting cowl.

Yarn: Regia Angora Merino (65% New Wool, 25% Polyamide, 10% Angora; 219 yards [200 meters]/50 grams); #7083 Teal - one skein (color A) & #7080 Fuchsia - one skein (color B)

My attempted close-up of the mirage-like color pattern.
Or something.
Needles: One 20" circular needle in size US 2

Notions: Tapestry needle, three stitch markers

Gauge: 30 stitches = 4 inches

Using your color A yarn, cast on 160 stitches, place marker, and join in round. Then we'll knit four rows in a k2, p2 ribbing, followed by a knit row during which you'll place your extra stitch markers 20 stitches from either side of your row marker. And then, we'll move on to the main pattern, which is...

Row 1: using color B, * k1, slip 1 with yarn in back (wyib) * until you reach first marker, m1l, slip marker, k2, and * slip 1 wyib, k1 * until you reach second marker; then, slip marker, m1r, and * slip 1 wyib, k1 * until end of round

Friday, May 2, 2014

Slip-Stitch Mesh Hat

Slip-Stitch Mesh Hat

After I finished the Slip-Stitch Mesh Fingerless Gloves, I figured I had just enough yarn left in my skein for a hat. And it seemed like a good idea to make a hat that matched the gloves, since they're knit from the same stuff and all. So, if you're interested in knitting the smaller size of the gloves and the hat as written (I give a variation to make it slightly larger below, and I'm not sure you have enough yarn to accomplish it if you're making the gloves too), you can probably do it with just one ball. Otherwise, of course, they're both good stash projects that don't use too much yardage!

The back. Simple and clean.
Yarn: Berroco Vintage (52% Acrylic, 40% Wool, 8% Nylon; 218 yards [200 meters]/100 grams); #5120 Gingham - one skein

Needles: One 16" circular needle in size US 9, one 16" circular needle in size US 7, one set of double pointed needles, also in size US 9

Notions: Tapestry needle

Gauge: 18 stitches = 4 inches on size 8 needles

Using your size 7 needle, cast on 90 stitches, place marker, and join in round. Knit one inch in a p1, k1 ribbing and then switch to your size 9 needle. And then, we'll be moving on to the main pattern, which uses a variation on Slip-Stitch Mesh from page 156 of Barbara G. Walker's A Treasury of Knitting Patterns, and goes as follows: