Wednesday, July 30, 2014

Sunny Stripes Hat

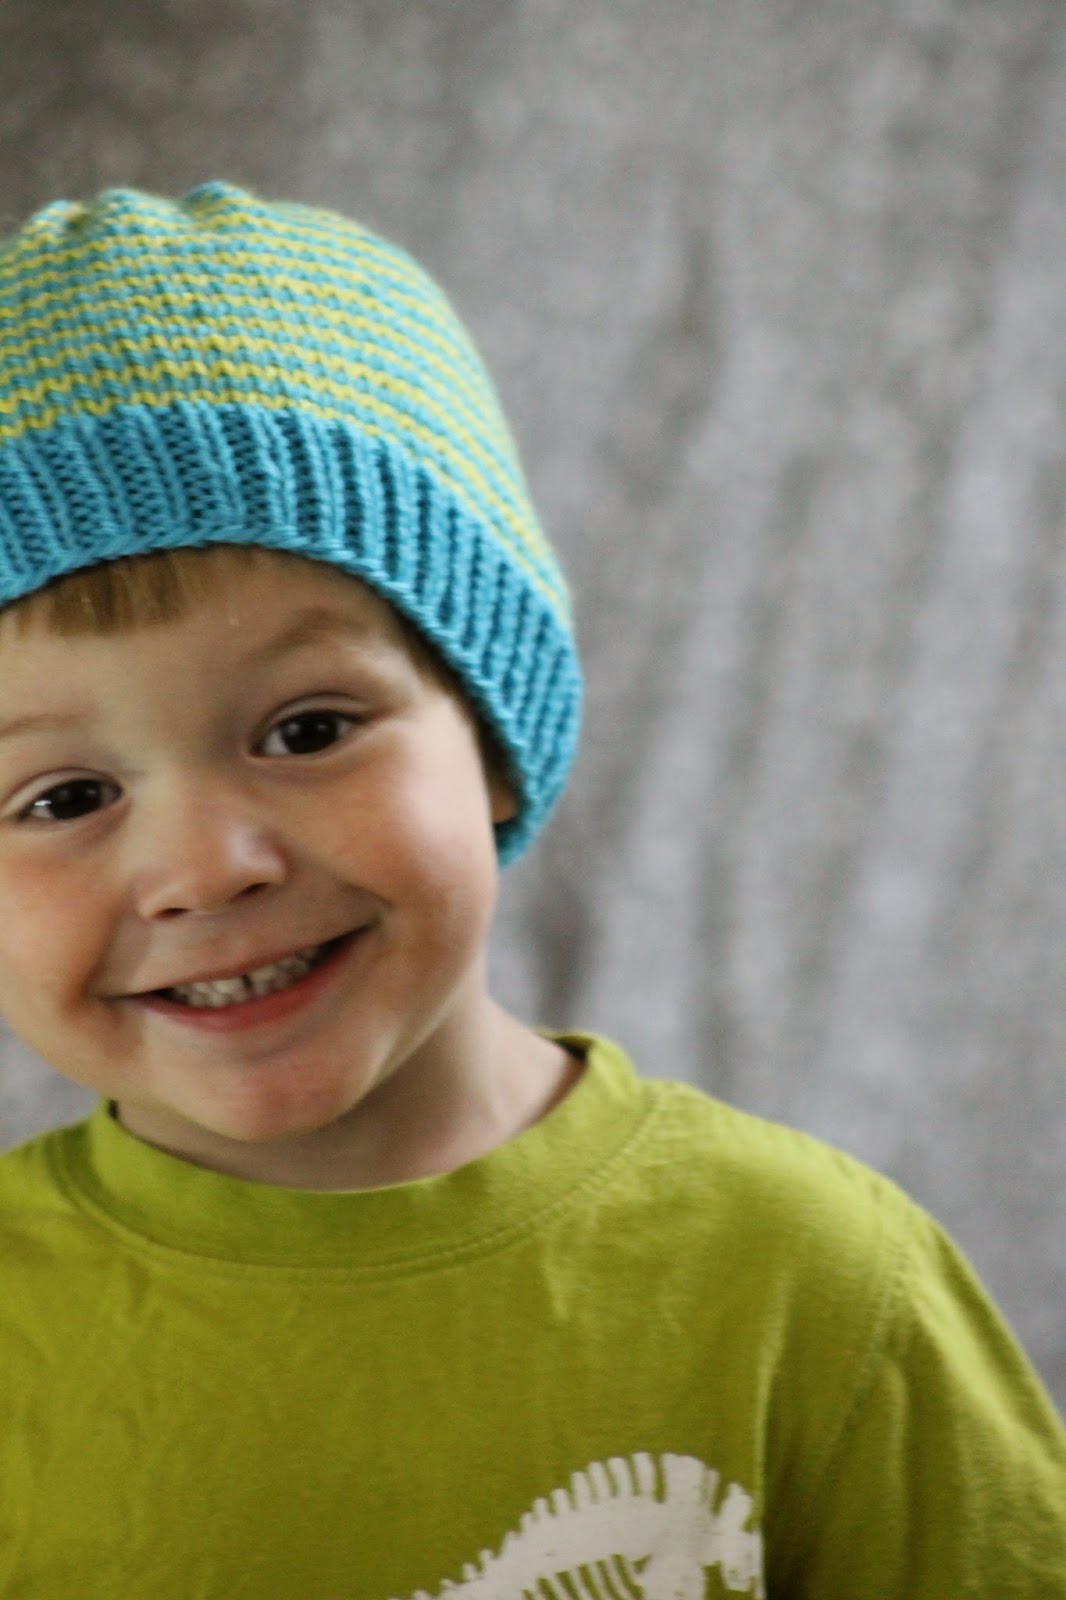
Sunny Stripes Hat
... plus a very wiggly child...

Sometimes, I feel as if I'm trapped in an endless hat knitting cycle with my children; as soon as I finish a hat for one of them, the other one immediately gets jealous and demands yet another hat. Which is how the Sunny Stripes Hat came to be, in all of its stripe-y glory. And it's not just the stripes that make it fun; it's also the slip stitch accentuated finish, which make it look almost like the celestial body it's named for. Plus, it comes in all sizes, so you can knit one for every member of your family (pets excluded)!

Sizes: Small (Medium; Large) (Small is 7.5" from crown to bottom, and will fit up to a 20" circumference head - think pre-schooler to young elementary, unless the kid's got a huge noggin like my children; Medium is 8.5" from crown to bottom, and will fit up to a 22" circumference head - think older kid to teen to smaller-headed adult (this would be my size); and Large is 9.5" from crown to bottom, and will fit up to a 24" circumference head - perfect for my husband)
The finishing. Slipped stitches
give it an extra sunny feel.

Yarn: Cascade Yarns Cascade 220 (100% Peruvian Highland Wool; 220 yards [200 meters]/100 grams); #8906 Blue Topaz - one skein (color A), Cascade Yarns Cascade 220 Heathers (100% Peruvian Highland Wool; 220 yards [200 meters]/100 grams); #2439 Gelato - one skein (color B)

Needles: One 16" circular needle in size US 5, one 16" circular needle in size US 7, one set of double pointed needles (dpns), also in size US 7

Notions: Tapestry needle, stitch marker

Gauge: 20 stitches = 4 inches

Before we begin, a quick note about sizing; as you may have noticed, I recommend medium for anyone between, like, 5 and adult. This is simply because most head growth occurs in the first couple of years, and, for instance, my five-year-old's head is only 1" smaller than mine in circumference and 1/2" smaller than mine crown-to-base-of-ear. Which means, yes, we would both wear the medium. Of course, not everyone's children have such monstrous heads, and the small size could fit a much older child. Finally, if you're knitting this hat as a gift and have no idea about sizing, I recommend large for most men, medium for most women and teens, and small for most everyone between 2 and 8 or so. Go up a size if they seem large-headed, or add 1/2" to 1" to the length. And now that we're all thoroughly confused, let's get started!

Wednesday, July 23, 2014

Colorblocked V Cowl

Colorblocked V Cowl

Guess what, dudes?!?! Today marks the publication of my 100th pattern (this one, of course), and to celebrate, I'm posting something I love so much that I'm even going to keep it. And not only is the Colorblocked V Cowl next-level cute, but it's also an excellent choice for your leftover yarns (in fact, I made it with the yarn remaining after I knit the Arrowhead Lace Cowl II and the Striped for Spring Cowl). So let's get right to it!

Update (10/23/14): As of today, you can also find back-and-forth instructions for this piece following the regular instructions (so that means no circular knitting at the top)!

Yarn: Schachenmayr smc Cotton Bamboo (75% Cotton, 50% Bamboo; 131 yards [120 meters]/50 grams); #64 Aqua - one skein (color A), Cascade Yarns Ultra Pima (100% Pima Cotton; 220 yards [200 meters]/100 grams); #3777 African Violet - 1 skein (color B); #3705 Heathered Pansy - 1 skein (Color C)

Here you can see the detail a few slipped
stitches adds
Needles: One 16" or 20" circular needle in size 6

Notions: Tapestry needle, three stitch markers

Gauge: 22 stitches = 4 inches

So let's get started! Using your color A yarn, cast on 112 stitches, place marker, and join in round (please note that this cowl, when finished, will be just over 20 inches in circumference. This should accommodate most head sizes, since knit stuff stretches and all, but if you want instructions for a slightly larger piece, just hit me up. It's still ballstothewallsknits@gmail.com). Anyway, then you'll knit the following row to place your extra stitch markers:

Stitch Marker Placement Row: k1, (p1, k1) 27 times, place marker, p2, place marker, k1, * p1, k1; rep from * to end of round

And now, we'll move on to a seed stitch for the top band of this cowl, like so:

Row 1: p1, * k1, p1 * to first marker, slip marker, p2, slip marker, p1, * k1, p1 * to end of round

Wednesday, July 16, 2014

Striped Anemone Cowl

Striped Anemone Cowl

Since I've been on maternity leave (the baby is now over two months old! and so cute!), I've been trying to use up all of my leftover yarn instead of going out and buying more. So, although my soul is suffering serious separation anxiety after going so long without a trip to the yarn store, my odds-and-ends pile is getting slimmer and slimmer. And this particular cowl is knit with the leftovers from the Long-Slip Striped Table Runner. Luckily, I'm still not tired of knitting with this yarn, although at this point I have very little left.

Detail. It really does look like little sea anemones, no?
Yarn: Plymouth Yarn Jeannee (51% Cotton, 49% Acrylic; 111 yards [102 meters]/50 grams); #0023 (Lavender) - one skein (color A), #0006 (Sage) - one skein (color B), #0022 (Gray) - one skein (color C), & #0033 (Teal) - one skein (color D)

Needles: 16" or 20" circular needle in size 8

Notions: Tapestry needle

Gauge: 18 stitches = 4 inches

Using your color A yarn, cast on 100 stitches, place marker, and join in round. Purl one row around. And now, it's time to begin our main pattern, which is a four-color, in-the-round variation on Anemone Stitch from page 131 of Barbara G. Walker's A Second Treasury of Knitting Patterns. As you'll notice when you're knitting it, your back seam will be very loose. The best way to combat this is by clipping the tail of each color yarn after you work it and knotting the tails instead of trying to carry them up the piece. Oh, and the pattern won't start looking good until you knit a few rows, so don't get scared if it looks weird at first! Anyway, let's proceed like so:

Row 1: using color B, * k1, (yo) twice; rep until *

Wednesday, July 9, 2014

Kids' Reversible Cocoon Hat

Kids' Reversible Cocoon Hat - right side

My five-year-old picked out this yarn ages ago, and has been bugging me to make something with it ever since. And after rejecting my first two designs (what can I say? the kid knows what he wants!), this fun hat finally passed muster. Even better, the wrong side of the design is just as charming as the right side, so the child you knit it for can wear it either way!

Kids' Reversible Cocoon Hat - wrong side
Sizes: Ages 18 months - 3 years (Ages 4 - 6; Ages 7 - 10)

Yarn: Cascade Yarns Cascade 220 Fingering (100% Peruvian Highland Wool; 273 yards [250 meters]/50 grams); #9430 Forest Green - one skein

Needles: 16" circular needle in size 3, one set of double pointed needles, also in size 3

Notions: Tapestry needle, stitch marker

Gauge: 28 stitches = 4 inches

So let's do this thang! First, using your circular needle, cast on 128 (144; 144) stitches, place marker, and join in round. Then we'll knit 1" (1.75"; 1.25") in a k1, p1 ribbing. And then we'll get right to the main pattern, which is Cocoon Stitch from page 131 of Barbara G. Walker's A Second Treasury of Knitting Patterns, except adapted for the round. As you can see, there is no difference in pattern between the three sizes. And here we go!

Wednesday, July 2, 2014

Arrowhead Lace Cowl II

Arrowhead Lace Cowl II

When I first bought this yarn, I had a certain idea of what to do with it. Then, of course, the minute I started knitting, I realized that this fiber was unsuited for my plan - although it drapes nicely in this particular piece, it was too stiff for my original design. And THEN I remembered how lovely the lace pattern from the original Arrowhead Lace Cowl was, and I knew I had a winner for this fiber. To create a more necklace-like appearance, I also decided to seam the stockinette portion at the back of this piece. This also keeps it a lighter weight for warmer weather!
The pattern, again.

Yarn: Schachenmayr smc Cotton Bamboo (75% Cotton, 50% Bamboo; 131 yards [120 meters]/50 grams); #64 Aqua - two skeins

Needles: 24" circular needle in size 4

Notions: Tapestry needle, five stitch markers

Gauge: 22 stitches = 4 inches

So let's get started! First, cast on 181 stitches loosely, place marker, and join in round. Then, knit 10, place first extra marker, k71, place second extra marker, k19, place third extra marker, and then knit until the you have 10 stitches left in the round and place your final extra marker. Then, knit until end of the round. And once that's done, it's time to begin our pattern, which incorporates Arrowhead Lace from page 193 of Barbara G. Walker's A Treasury of Knitting Patterns. As a side note, I read somewhere on the Internet (wish I remembered where!) that you can straighten out your ssk's by knitting the ssk stitch through the back loop when you come to it on the next round. I used that technique. You can too, if you want! Anyway, we'll proceed as follows:

Wednesday, June 25, 2014

Wickerwork Hat

Wickerwork Hat

I stumbled across this yarn in my stash the other day and I realized that it would make the perfect gift for a friend who's about to move away. So I got right down to work and created this fun Wickerwork Hat, complete with pompom (there is a photo of it without the pompom below, in case you want to see it without). It would also make a great stash-busting holiday gift, since I think most of us have at least a skein or two of worsted-weight wool hanging around!

* Note: As of November 2, 2015, I have added a chart to this pattern using the ever-wonderful chart generator here. You can find it below. Please note, however, that I had to do some funky stuff with the charting to make it work (it should all be explained in the chart graphic, but let me know if there's a problem. Also, let me know if there's a better way to chart any of my issues, and I'll fix it! :) )

Sans pompom. In a different color, this would
make a nice man-hat as well.
Yarn: Patons Classic Wool (100% Pure New Wool; 210 yards [192 meters]/100 grams); #202 (Cream) - one skein

Needles: 16" circular needle in size US 5, 16" circular needle in size US 8, one set of double pointed needles, also in size US 8

Notions: Tapestry needle, stitch marker

Gauge: 20 stitches = 4 inches on size 7 needles

So let's get started! First, using your size 5 needle, cast on 104 stitches, place marker, and join in round. Then, knit 1.5" in the following ribbing:

Ribbing Row: k1, * p2, k2; rep from *; end p2, k1

And once that's done, we'll switch to our size 8 needles and our main pattern, which is Wickerwork Pattern from page 146 of Barbara G. Walker's A Second Treasury of Knitting Patterns. For this pattern, we'll need the following notation (you can find videos for the techniques below them):

rt (right twist): knit two together, leaving stitches on left-hand needle; next, insert right-hand needle from the front between the two stitches just knitted together, and knit the first stitch again.  Finally, slip both stitches from left-hand needle together

Monday, June 23, 2014

How to Make a Yarn Pompom

I'm getting ready to post a hat that needs a pompom, so I figured that it was finally time to suck it up and write out some pompom-making instructions. And while I know there are many methods, this is the one I think works best. So let's get started!

1. Notice my circles aren't perfect. They don't need to be!

1. Cut out two cardboard circles that are roughly 3” in diameter, and cut a 1” hole in the middle. As you’ll notice, exact precision isn’t necessary. You can also cut bigger or smaller circles, depending on how big you want your pompom to be (this one will be a shy two inches, since that's the difference between your outer circle and your inner circle, and it shrinks a little with the tight wrapping. If you make a mondo pompom, you'll want to cut a bigger center hole, since you'll need a boatload of wrapping to make it look right).

2. And now, start wrapping that sucker up!

2. Thread a long tail (3+ yards, or as much as you’re willing to use, really) of yarn on your tapestry needle, and then, holding your two cardboard pieces together, loop through center hole repeatedly, with some care not to get your end tangled up in the loops.

Wednesday, June 18, 2014

Long-Slip Striped Table Runner

Long-Slip Striped Table Runner

I'm not exactly sure why I decided to knit a table runner, but I think it was some combination of wanting to create a non-wearable knit for summer and NOT wanting to knit four whole placemats (if the baby won't even let me knit more than one coaster, you know a gaggle of placemats will never happen). Whatever my inspiration was, however, I totally dig the end result - colorful, cheerful, and functional, this table runner is a great choice if you want to keep knitting through the summer but don't want to make winter-y items. It would also make a lovely gift, if Christmas knitting is already on your mind...

A close-up of the pattern. So stripey!
Yarn: Plymouth Yarn Jeannee (51% Cotton, 49% Acrylic; 111 yards [102 meters]/50 grams); #0023 (Lavender) - two skeins (color A), #0006 (Sage) - one skein (color B), #0022 (Gray) - one skein (color C), & #0033 (Teal) - one skein (color D)

Needles: Straight needles in size 8, at least a 24" circular needle in size 6 (there's no circular knitting here, but you will need something long to pick up stitches along the edge of the runner)

Notions: Tapestry needle

Gauge: 18 stitches = 4 inches on size 8 needles

Using your color A yarn and your size 6 needles, cast on 53 stitches loosely. Then, work the following rows:

Set-up Rows 1 - 9: using color A, k1, * p1, k1; rep from *

Wednesday, June 11, 2014

Eiffel Tower Eyelet Cowl

Eiffel Tower Eyelet Cowl

So, there's not too much I need to explain about this cowl, except that it accomplishes the impossible; it makes me love both a purl-background fabric and the freakin' garter stitch, which I typically avoid like the plague (and yes, it's completely irrational how much I dislike garter stitch. I apologize to those of you who love it). It's also a simple enough design to look good with a variegated yarn, although I imagine it would pop even more with a single-color fiber. Anyway, let's cut the chitchat and head to the pattern instead!

A detail shot. See the tiny towers???
Yarn: Berroco Boboli Lace (42% Wool, 35% Acrylic, 23% Viscose; 350 yards [320 meters]/100 grams); #4366 Fondant - one skein

Needles: 24" circular needle in size 6, 20" circular needle in size 6

Notions: Tapestry needle, three stitch markers

Gauge: 24 stitches = 4 inches

So let's get started! First, then, using your 24" needle, cast on 192 stitches loosely, place marker, and join in round. And now, we'll work the bottom border, which is Swiss Ribbing from page 340 of Barbara G. Walker's A Second Treasury of Knitting Patterns. Or in knitting terms, let's begin like so:

Rows 1 - 4: * k3, p3; rep from *

Rows 5 & 6: * k1, slip 1 with yarn in back (wyib), k1, p3 *

Wednesday, June 4, 2014

Little Ladders Coasters

Little Ladders Coasters. Er, coaster...

I suppose I should begin this post with a clarification; despite the fact that I called it "Little Ladder Coasters," I only actually knit one (the yarn is leftover from the Mirage Cowl, in case you're wondering. And I could have knit many, many more). Anyway, it turns out that knitting with a new baby is not easy, and one single coaster has now become an entire week's worth of knitting. Luckily, one is all you need if you're drinking alone!

Some pattern detail... with terrible color! Whoops.
Yarn: Regia Angora Merino (65% New Wool, 25% Polyamide, 10% Angora; 219 yards [200 meters]/50 grams); #7080 Fuchsia - one skein (color A) & #7083 Teal - one skein (color B)

Needles: Straight needles in size 2

Notions: Tapestry needle

Gauge: 30 stitches = 4 inches

Using your color A yarn, cast on 30 stitches loosely. Then, we'll work the following set-up rows:

Set-up Rows 1 - 3: using color A, * k1, p1; rep from *

Set-up Row 4: using color B, knit

Wednesday, May 28, 2014

Fretted Band Cowl

Fretted Band Cowl

The explanation for this cowl is simple: I love these two yarns together, even if my husband originally thought the combination was strange. And while this piece turned out more like the Sweet Strawberry Cowl and the Sugar & Ice Cowl than I originally intended, it has enough differences to set it apart. Like the slip stitch pattern, for instance, which would also look good in more contrasting yarns.

Yarn: SMC Select Reflect (52% Viscose, 48% Cotton; 131 yards [120 meters]/50 grams); #4108 - one skein (color A), SMC Select Violena Colori (50% Cotton, 50% Modal; 109 yards [100 meters]/50 grams); color #4307 (color B)

The slip stitch pattern, closer up.
Needles: One 20" circular needle in size 6, two double pointed needles (dpns), also in size 6

Notions: Tapestry needle, two stitch markers

Gauge: 21 stitches = 4 inches

So let's get this thing started! To begin, use your color A yarn to cast on 144 stitches, place marker, and join in round. Then we'll knit a couple of edging rows, as follows:

Edging row: using color A, * k2, p2, k2; rep from *

Knit the edging row three times, and then we'll transition to our slip stitch pattern, which is a variation on Fretted Band Pattern from page 67 of Barbara G. Walker's A Second Treasury of Knitting Patterns. We'll be slipping all stitches with the yarn in the back. And we'll proceed like so:

Rows 1 & 2: using color B, knit